Kanban: More Than Just Todo, Doing, Done – Part 2
In previous, we explored the history of Kanban and its three core principles: Visualize, Limit WIP, and Manage Flow.
This part focuses on two essential components of Kanban practice:
- Visualizing work
- Limiting work in progress (WIP)
Visualizing Work
Kanban uses three tools to make work visible: Boards, Queues, and Work Items.
A Board shows the workflow. Each column represents a Queue, and each queue contains Work Items.
Types of Kanban Boards
Kanban boards are flexible. Teams can design them to suit their context. Here are three variations:
The Space Saver
Instead of moving work left to right, this board rotates items clockwise to save space.

The HR Web
An HR team at Transpire designed a hexagon-shaped board. Each edge represents a candidate source, and the center marks the offer stage.

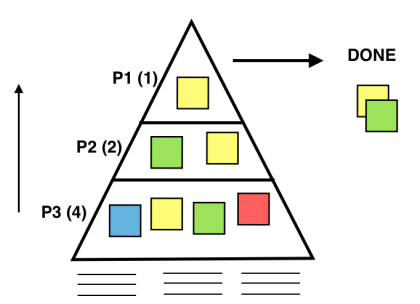
The Priority Pyramid
This board stacks work from the base upward. Each level limits WIP strictly to maintain focus.
Physical or Digital Boards?
There’s no one-size-fits-all answer. Teams must weigh the pros and cons of each type.
Digital Boards:
- Centralize information and offer remote access.
- Prevent data loss (e.g., no falling stickies).
- Generate metrics and reports easily.
- Support quick edits and integration with other tools.
Physical Boards:
- Are larger and more visible in shared spaces.
- Are cheap and easy to set up.
- Allow quick structural changes (write/draw freely).
Choose the board—or combination—that fits your team’s workflow.
Queues
Each queue holds work items in the same state. When viewing the board, team members can quickly see where each item stands:
- Todo – Not yet started
- Analyze – Under review or investigation
- Development – In progress
- Test – Being verified
- Done – Completed
Teams can break queues into sub-queues for more detail.

Each queue should follow a clear policy. For example, an item in “Development Done” must meet these conditions:
- Deployed to the dev environment
- Code coverage ≥ 85%
- Reviewed by the whole team
Clear policies reduce confusion and speed up handoffs.
Work Items
Each Work Item represents a task. On physical boards, it’s often a sticky note. On digital boards, it’s a card.

Card Layout Tips:
- Include title, PIC, due date, and ID.
- Avoid cluttering cards with too much or too little information.
- Use color-coding to distinguish task types.
To spot stale items, some teams use a “banana sticker.” As time passes, the sticker darkens—turning black signals a potential issue.

Limiting Work in Progress (WIP)
Visualization alone isn’t enough. Without focus and resource control, work items pile up unfinished.

How to Find the Right WIP Limit
WIP limits vary by team, but a few principles help guide the choice:
- Lower is better than higher: Fewer ongoing tasks improve lead time, feedback loops, and blocker resolution.
- People idle or work idle: Too many tasks lead to delays. Too few, and people wait.

- No limits = chaos: Without limits, risks multiply, and delivery slows.
Stop starting. Start finishing. Focus on finishing tasks, not starting new ones.
Limiting WIP by Column
The simplest way to limit WIP is by setting a cap per queue.
Think of it like traffic flow. If a wide road connects to a narrow one, a jam forms unless the incoming flow is controlled. Similarly, setting WIP caps upstream avoids downstream bottlenecks.
In software teams, for example, if you have 4 developers and 1 tester, limit WIP in Development to prevent overload in Testing.

Limiting WIP by Person
You can also limit WIP per individual, but how?
If 5 people have WIP = 1, then one person getting blocked stops the team. If WIP = 2, blocked tasks may be abandoned.
A good starting point is 1.5 × team size (e.g., 5 people → WIP limit = 7–8).
No formula fits all cases. You must tune the limit based on your team’s work style and context.
In Summary
This was a deep dive into two critical Kanban elements: visualizing work and limiting WIP. In the final part of this series, we’ll explore estimating, planning, retrospectives, reporting, and common Kanban pitfalls.